Native Windows install
Document not ready for translation
This install is based on Windows Server 2022 using:
Python 3.12 running in a virtualenv
Database: PostgreSQL
DICOM Store SCP: Orthanc running on port 104
Webserver: Microsoft IIS running on port 80
WinSW to run background tasks as services
Notepad++ for editing files
Database files stored on D:
OpenREM files stored on E:
With Physics (QA) images being collected and zipped for retrieval
The instructions should work for Windows Server 2016 and 2019; and will probably work with Windows 10/11 with some modification. Desktop editions of Windows are not recommended for a production OpenREM install.
If you are upgrading an existing installation to a new Windows server, go to the Upgrading to a new Windows server first.
If you are upgrading an existing Windows Server installation in-place, go to Upgrading a native Windows install instead.
If you are installing on a server with no internet access, go to Offline installation or upgrade to download the packages.
These instructions assume the following disk layout - there is more information about the reasoning in the box below:
C:OS diskD:Database diskE:Data disk
Initial prep
Creating folders
Why D: and E: drives?
OpenREM data are stored on drive E: to keep the data away from the operating system drive so that it is easier for building/recreating the server and knowing what needs to be backed up.
For the same reason, we will install PostgreSQL so that the database data are store on drive D: - this makes it possible to provide a different configuration of disk for the database drive, with different backup policies.
However, it is also possible to store all the data on the C: drive if that works better for your installation. In this case, it would be advisable to create a folder C:\OpenREM\ and create all the folders specified below into that folder.
You can also use different drive letters if that works better for your installation. In both cases paths will need to be modified in the instructions to suite.
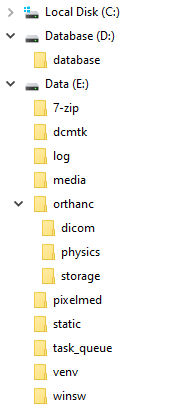
Figure 1: Windows install folder layout
Create the following folders. The instructions here are for a CMD window but they can be created in Windows Explorer
instead:
C:\Users\openrem>D:
D:\>mkdir database
D:\>E:
E:\>mkdir log media pixelmed dcmtk 7-zip static task_queue venv orthanc\dicom orthanc\physics orthanc\storage winsw
Set permissions
Right click on the
E:\logfolder and clickPropertiesIn the
Securitytab clickEdit...andAdd...
If the server is connected to a domain
If the server is connected to a domain, the From this location: will have the name of the domain. Click
Locations... and choose the name of the server instead of the domain name.
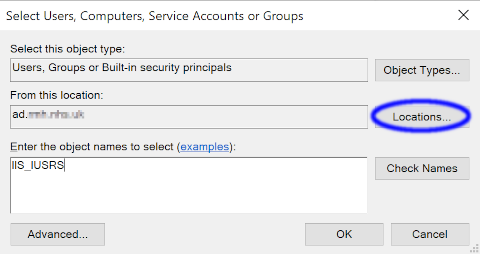
Figure 2: Set account location
Enter the object name
IIS_IUSRSand clickOKTick the
ModifyAllowto enable read and write permissionsClick
OKtwice to close the dialoguesRepeat for the
E:\media,E:\task_queueandE:\orthanc\dicomfolders
Installing packages
Python
Download the latest version for Windows from https://www.python.org/downloads/ as long as it is in the 3.12 series.
Open the downloaded file to start the installation:
Customize installation
Leave all the Optional Features ticked, and click
NextTick
Install for all users- this will automatically tickPrecompile standard libraryInstallClick to
Disable path length limit- might not be necessary but might be useful!Close
Orthanc
Download the 64 bit version from https://www.orthanc-server.com/download-windows.php.
The download file might be blocked because it isn’t a commonly downloaded executable. Click the ... menu
and select Keep. Then click Show more and Keep anyway.
Open the downloaded file to start the installation:
Click
Next >, accept the agreement andNext >again.Default install location,
Next >Select Orthanc storage directory -
Browse...toE:\orthanc\storage,OKandNext >Click
Next >for a Full installationStart Menu Folder
Next >Ready to Install
InstallFinish
PostgreSQL
Download the latest version of PostgreSQL from https://www.enterprisedb.com/downloads/postgres-postgresql-downloads - choose the Windows x86-64 version. OpenREM v1.0 has been tested with PostgreSQL v14 and v16.
Open the downloaded file to start the installation:
Some Microsoft redistributables will install
Click
Next >to startDefault Installation Directory
Next >All components
Next >Data Directory - browse to
D:\databasethenSelect folderandNext >Create a password for the
postgressuperuser - you will need this to setup the database with pgAdmin 4 laterEnter it twice and
Next >Default port
Next >Default Locale
Next >Pre Installation Summary
Next >Ready to Install
Next >and the installation will beginUntick
Launch Stack Builder at exitFinish
gettext
What is gettext for?
The gettext binary enables the translations to be available to users of the web interface. It is not essential if you don’t want the translations to be available.
Download the 64 bit static version of gettext from https://mlocati.github.io/articles/gettext-iconv-windows.html.
Use the .exe version (software install icon, not the zip icon)
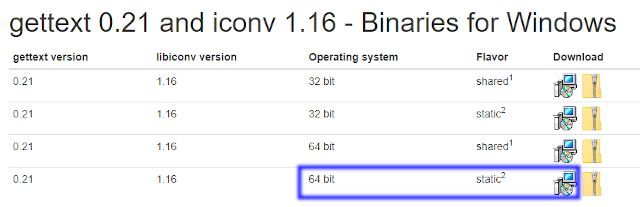
Figure 3: gettext download page
Open the downloaded file to start the installation:
Accept the agreement
Next >Default installation directory
Next >Additional Tasks leave both boxes ticked
Next >Ready to Install
InstallFinish
Pixelmed
Download DoseUtility from from the page
http://www.dclunie.com/pixelmed/software/webstart/DoseUtilityUsage.html - find How to install it (locally) near the
bottom of the page and click the Windows executable that does not require Java to be installed link.
Figure 4: Pixelmed download page
Open the downloaded zip file and open a new file browser at
E:\pixelmedDrag the contents of the zip file to the
pixelmedfolder
DCMTK
What is DCMTK for?
The DCMTK binary files are used to import dose summary files from older Toshiba CT scanners that are not able to create DICOM Radiation Dose Structured Reports (see For CT dose summary files from older Toshiba CT scanners). If you don’t need to do this then you can skip the installation of the DCMTK.
Download from https://dcmtk.org/dcmtk.php.en - look for the DCMTK executable binaries section, and download the
64 bit DLL build for Windows.
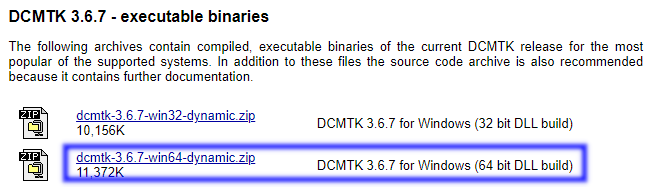
Figure 5: DCMTK download page
Open the downloaded zip file and open a new file browser at
E:\dcmtkDrag the contents of the dcmtk-3.x.x-win64-dynamic folder in the zip file to the
dcmtkfolderYou should end up with
E:\dcmtk\bin\etc
7Zip
What is 7Zip for?
7Zip is used by Orthanc when saving physics DICOM studies to the server, when this has been enabled (see DICOM Store SCP).
Download the 64-bit x64 exe file from https://www.7-zip.org/
Type, or click on the
...to browse toE:\7-zip\InstallClose
WinSW
What is WinSW for?
WinSW enables the Huey workers, which run background OpenREM tasks, to be used as a Windows service (see Task queue).
Download the 64-bit x64 exe file from https://github.com/winsw/winsw/releases/tag/v2.12.0
Open a new file browser at
E:\winswDrag the exe file to the
winswfolderRename the exe file from
WinSW-x64toWinSW
Notepad++
What is Notepad++ for?
Notepad++ is a popular text file editor which makes editing the OpenREM configuration files easier than if using Windows built-in Notepad application.
Download the latest version of Notepad++ from https://notepad-plus-plus.org/downloads/
Open the downloaded file to start the installation:
Select a language
OKWelcome
Next >License Agreement
I AgreeInstall Location
Next >Choose Components
Next >InstallFinish(you can untick theRun Notepad++option, we don’t need it yet)
IIS
Open the Control Panel
Search for
windows featuresSelect
Turn Windows features on or offStart the wizard
Next >Role-based or feature-based installation
Next >Leave the current server highlighted
Next >Check the
Web Server (IIS)boxIn the pop-up dialogue for adding IIS Management Console, click
Add FeaturesNext >Features,
Next >Web Server Role (IIS)
Next >Expand the
Application DevelopmentsectionCheck the
CGIbox,Next >InstallClose
Running OpenREM on Windows 10 or Windows 11?
For non-server environments follow these IIS instructions:
Open the Control Panel
Search for
windows featuresSelect
Turn Windows features on or offCheck the
Internet Information Servicesbox (figure 6)Expand the
Internet Information Services-World Wide Web Services-Application Development Featuressub-menu (figure 7)Check the
CGIbox (figure 7)Click
OK
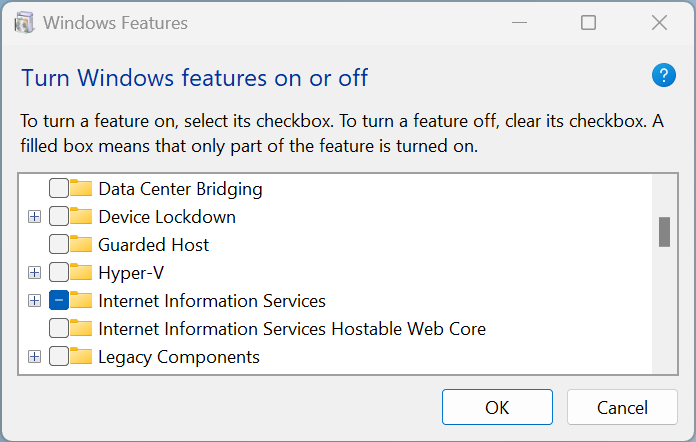
Figure 6: Enabling IIS on Windows 11
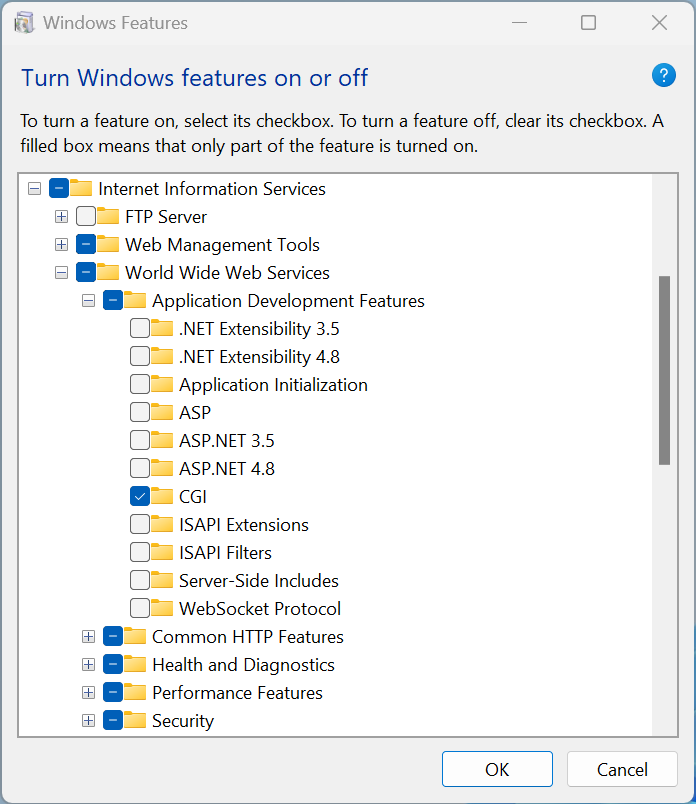
Figure 7: Enabling CGI within the IIS settings on Windows 11
You can check the server is running by browsing to http://localhost/ on the server. You should see the default IIS Welcome page. It might not work immediately, check again in a few minutes.
Installing Python packages
Create and activate the virtualenv
Open a CMD window:
C:\Users\openrem>e:
E:\>py -m venv venv
E:\>venv\Scripts\activate
(venv) E:\>
Install OpenREM
Installing on a server with no internet access
Make sure the virtualenv is activated (command line will have the name of the virtualenv as a prefix:
(venv) E:\), then navigate to where the openremfiles directory is that you copied from the computer with
internet access, eg if it is in your desktop folder:
(venv) E:\>c:
(venv) C:\>cd Users\openrem\Desktop
Now upgrade pip and install OpenREM and its dependencies:
(venv) C:\Users\openrem\Desktop>pip install --no-index --find-links=openremfiles --upgrade pip
(venv) C:\Users\openrem\Desktop>pip install --no-index --find-links=openremfiles openrem
(venv) E:\>pip install --upgrade pip
(venv) E:\>pip install openrem==1.0.0b3
(venv) E:\>pip install wfastcgi
OpenREM configuration and database creation
PostgreSQL database creation
Start pgAdmin 4 - you will need the password you set when installing PostgreSQL
Create user
Click on
Serversto expand, enter the password againRight click
Login/Group Roles,Create,Login/Group Role...Name:
openremuserDefinition, Password: add a password for the openremuser
Privileges: activate
Can login?andCreate database?Save
Create database
Right click
Databases,Create,Database...Database:
openremdbOwner:
openremuserSave
Configure OpenREM
Open the E:\venv\Lib\site-packages\openrem\openremproject folder and rename the example local_settings.py and
wsgi.py files to remove the .windows and .example suffixes. Removing the file name extension will produce a
warning to check if you are sure - Yes:
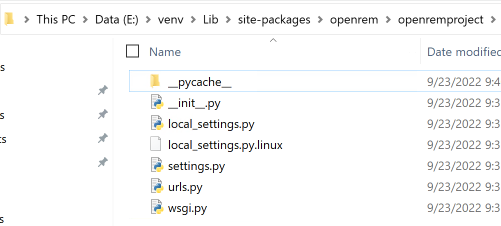
Figure 8: openremproject folder
Edit local_settings.py as needed (right click Edit with Notepad++) Make sure you change the PASSWORD, the
SECRET_KEY (to anything, just change it), the ALLOWED_HOSTS list, regionalisation settings and the EMAIL
configuration. You can modify the email settings later if necessary. Some settings are not shown here but are documented
in the settings file or elsewhere in the docs. For details on the final variable see Systems where Device Observer UID is not static.
Upgrading to a new server
If you are upgrading to a new Linux server, review the local_settings.py file from the old server to copy over
the ALLOWED_HOSTS list and the EMAIL configuration, and check all the other settings. Change the
SECRET_KEY from the default, but it doesn’t have to match the one on the old server. The database NAME,
USER and PASSWORD will be the ones you created on the new server. For details on the final variable see
Systems where Device Observer UID is not static.
DATABASES = {
    'default': {
        'ENGINE': 'django.db.backends.postgresql',  # Add 'postgresql', 'mysql', 'sqlite3' or 'oracle'.
        'NAME': 'openremdb',                     # Or path to database file if using sqlite3.
        'USER': 'openremuser',                   # Not used with sqlite3.
        'PASSWORD': '',                          # Not used with sqlite3.
        'HOST': '',                              # Set to empty string for localhost. Not used with sqlite3.
        'PORT': '',                              # Set to empty string for default. Not used with sqlite3.
    }
}

TASK_QUEUE_ROOT = 'E:/task_queue/'

MEDIA_ROOT = 'E:/media/'

STATIC_ROOT = 'E:/static/'
JS_REVERSE_OUTPUT_PATH = os.path.join(STATIC_ROOT, 'js', 'django_reverse')

# Change secret key
SECRET_KEY = 'hmj#)-$smzqk*=wuz9^a46rex30^$_j$rghp+1#y&i+pys5b@$'

# DEBUG mode: leave the hash in place for now, but remove it and the space (so DEBUG
# is at the start of the line) as soon as something doesn't work. Put it back
# when you get it working again.
# DEBUG = True

ALLOWED_HOSTS = [
    # Add the names and IP address of your host, for example:
    'openrem-server',
    'openrem-server.ad.abc.nhs.uk',
    '10.123.213.22',
]

LOG_ROOT = 'E:/log/'
LOG_FILENAME = os.path.join(LOG_ROOT, 'openrem.log')
QR_FILENAME = os.path.join(LOG_ROOT, 'openrem_qr.log')
EXTRACTOR_FILENAME = os.path.join(LOG_ROOT, 'openrem_extractor.log')

# Regionalisation settings
#   Date format for exporting data to Excel xlsx files.
#   Default in OpenREM is dd/mm/yyyy. Override it by uncommenting and customising below; a full list of codes is
#   available at https://msdn.microsoft.com/en-us/library/ee634398.aspx.
# XLSX_DATE = 'mm/dd/yyyy'
#   Local time zone for this installation. Choices can be found here:
#   http://en.wikipedia.org/wiki/List_of_tz_zones_by_name
#   although not all choices may be available on all operating systems.
#   In a Windows environment this must be set to your system time zone.
TIME_ZONE = 'Europe/London'
#   Language code for this installation. All choices can be found here:
#   http://www.i18nguy.com/unicode/language-identifiers.html
LANGUAGE_CODE = 'en-us'

DCMTK_PATH = 'E:/dcmtk/bin'
DCMCONV = os.path.join(DCMTK_PATH, 'dcmconv.exe')
DCMMKDIR = os.path.join(DCMTK_PATH, 'dcmmkdir.exe')
JAVA_EXE = 'E:/pixelmed/windows/jre/bin/java.exe'
JAVA_OPTIONS = '-Xms256m -Xmx512m -Xss1m -cp'
PIXELMED_JAR = 'E:/pixelmed/pixelmed.jar'
PIXELMED_JAR_OPTIONS = '-Djava.awt.headless=true com.pixelmed.doseocr.OCR -'

# E-mail server settings - see https://docs.djangoproject.com/en/2.2/topics/email/
EMAIL_HOST = 'localhost'
EMAIL_PORT = 25
EMAIL_HOST_USER = ''
EMAIL_HOST_PASSWORD = ''
EMAIL_USE_TLS = 0         # Use 0 for False, 1 for True
EMAIL_USE_SSL = 0         # Use 0 for False, 1 for True
EMAIL_DOSE_ALERT_SENDER = 'your.alert@email.address'
EMAIL_OPENREM_URL = 'http://your.openrem.server'

IGNORE_DEVICE_OBSERVER_UID_FOR_THESE_MODELS = ['GE OEC Fluorostar']
Populate OpenREM database and collate static files
In a CMD window, move to the openrem Python folder and activate the virtualenv:
C:\Users\openrem>e:
E:\>cd venv\Lib\site-packages\openrem
E:\venv\Lib\site-packages\openrem>e:\venv\Scripts\activate
(venv) E:\venv\Lib\site-packages\openrem>
Upgrading to a new server
If you are upgrading to a new Windows server, do these additional steps before continuing with those below:
Rename
E:\venv\Lib\site-packages\openrem\remapp\migrations\0001_initial.py.1-0-upgradeto0001_initial.py
Import the database - update the path to the database backup file you copied from the old server. These steps can take a long time depending on the size of the database and the resources of the server (be sure to use the correct path to your PostgreSQL binary folder):
C:\Users\openrem>"c:\Program Files\PostgreSQL\14\bin\pg_restore.exe" --no-privileges --no-owner -U openremuser -d openremdb -W windump.bak
Migrate the database:
(venv) E:\venv\Lib\site-packages\openrem>python manage.py migrate --fake-initial
(venv) E:\venv\Lib\site-packages\openrem>python manage.py migrate remapp --fake
(venv) E:\venv\Lib\site-packages\openrem>python manage.py makemigrations remapp
Warning
Make sure you didn’t get a RuntimeWarning when running the last command - scroll back up to the command and
check you don’t see the following:
(venv) E:\venv\Lib\site-packages\openrem>python manage.py makemigrations remapp
E:\venv\lib\site-packages\django\core\management\commands\makemigrations.py:105: RuntimeWarning:

Got an error checking a consistent migration history performed for database connection 'default': unable to
open database file
If you do, check the database name and password settings in the local_settings.py file. You will need to delete
the file E:\venv\Lib\site-packages\openrem\remapp\migrations\0001_initial.py before trying again.
(venv) E:\venv\Lib\site-packages\openrem>python manage.py migrate
(venv) E:\venv\Lib\site-packages\openrem>python manage.py loaddata openskin_safelist.json
(venv) E:\venv\Lib\site-packages\openrem>python manage.py collectstatic --no-input --clear
Create the translation files, assuming gettext was installed:
(venv) E:\venv\Lib\site-packages\openrem>python manage.py compilemessages
If this is a new install, not an upgrade, create the superuser account:
(venv) E:\venv\Lib\site-packages\openrem>python manage.py createsuperuser
Webserver
Configure IIS
Open
Internet Information Services (IIS) Managerfrom the Start menu or the Administrative Tools.Click on the name of your server in the
Connectionspane on the leftDouble click on
FastCGI SettingsIn the
Actionspane on the right, clickAdd ApplicationIn the
Full Path:box type or browse toE:\venv\Scripts\python.exeIn the
Argumentsbox type the path to wfastcgi.py:E:\venv\Lib\site-packages\wfastcgi.pyUnder FastCGI properties, click on
(Collection)next toEnvironment Variablesand click on the grey…boxIn the EnvironmentVariables Collection Editor click
AddChange the value of
NametoDJANGO_SETTINGS_MODULE(must be upper-case)Set the
Valuetoopenremproject.settingsClick
Addagain and add the variable namePYTHONPATHwith the valueE:\venv\Lib\site-packages\openremClick
Addagain and add the variable nameWSGI_HANDLERwith the valuedjango.core.wsgi.get_wsgi_application()Click
OK
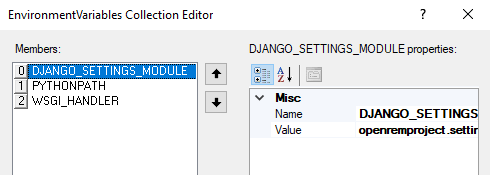
Figure 9: Environment Variables Collection Editor
Under FastCGI Properties -> Process Model click on the
Activity Timeoutvalue and change it to1200
Activity Timeout on slow running systems
If you encounter issues with long-running requests failing on slow running systems, you might try increasing the
value of the Activity Timeout further.
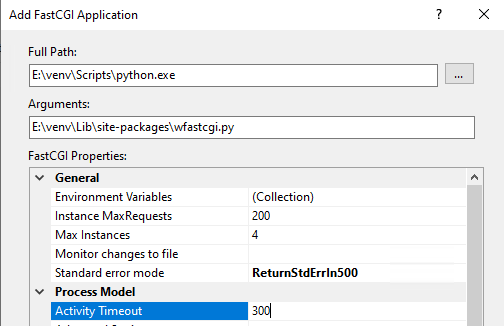
Figure 10: Add FastCGI Application settings
Click
OKto close the dialogue box
Create a new website
In the
Connectionspane expand the tree under server nameExpand the Sites folder, right click on
Default Websiteand clickRemoveClick
YesRight click on
Sitesand clickAdd Website…Enter Site name as
OpenREMUnder Content Directory Physical path enter or browse to
E:\venv\Lib\site-packages\openremClick
OK
Configure the new website
Click on the
OpenREMsite underConnectionsin the left paneDouble click on
Handler MappingsIn the right pane, under
ActionsclickAdd Module Mapping…In the
Request Pathbox enter an asterix (*)In the Module box select
FastCgiModule(not the CgiModule)In the
Executablebox enterE:\venv\Scripts\python.exe|E:\venv\Lib\site-packages\wfastcgi.pyIn
NametypeOpenREM CGI handler(value of name is not important)Click
Request Restrictionsand untick theInvoke handler only if request is mapped to:checkboxClick
OKtwice to close the Request Restrictions dialog and the Add Module Mapping dialogueWhen prompted
Do you want to create a FastCGI application for this executable?clickNo
Quick test!
You can now browse on the server to http://localhost/ and you should see an “ugly” version of the website. It will look better after we have configured the static files, next!
Configure IIS to server the static files
Right click on the
OpenREMsite underConnectionsin the left paneClick
Add Virtual DirectoryEnter
staticas the AliasEnter or browse to
E:\staticas the Physical pathClick
OKDouble click on
Handler Mappingsin the middle paneClick on
View Ordered List...in the right paneSelect
StaticFileClick
Move Upin theActionpane on the right untilStaticFileis at the topThere will be a warning about the list order being changed - click
Yesto continue
Test the webserver
Browse to http://localhost/ on the server, or browse to the servername in a browser on another machine, and you should be able to see the new OpenREM web service.
Task queue
Running OpenREM on Windows 10 or Windows 11?
For non-server environments, where task executors don’t need to be persistent across system restarts, there is a shortcut for starting workers. You can start a single worker in a new console as follows:
C:\Users\openrem>E:
E:\>cd venv\Lib\site-packages\openrem
E:\venv\Lib\site-packages\openrem>e:\venv\Scripts\activate
(venv) E:\venv\Lib\site-packages\openrem>python manage.py run_huey
If you want more than one worker to run tasks in parallel, you will need to repeat the previous steps for each additional worker in a new console.
You can stop a worker by pressing Ctrl + C in the appropriate console
If you cannot start a worker or you are getting error messages, please make sure that your current user
has read and write permissions in the E:\task_queue directory.
OpenREM uses a task queue to run its background tasks. Therefore, we need additional Windows services that allow us to run these tasks separately from the web application.
To accomplish that we need to do the following:
Create a local service account
First we need to create a Windows user account that will allow the IIS worker to control the task workers. Most importantly, to kill a task if necessary.
Open the
Server ManagerIn the navigation bar, click on
ToolsClick
Computer ManagementIn the left-hand pane under
System ToolsclickLocal Users and GroupsIn the middle pane right-hand click on
Usersand selectNew User...Fill in all required fields with the data of a new user account
Untick
User must change password at next loginClick
CreateIn the left pane click on
GroupsRight click on
IIS_IUSRSClick
Add to Group...Click on the
AddbuttonClick
Locationsand select the local server from the top of the list in theLocationboxClick
OKIn the textfield, enter the username of the previously created account
Click
Check Names- this should add the server name to the start of the name you enteredClick
Oktwice
Creating worker services
Copy the file from
E:\venv\Lib\site-packages\openrem\sample-config\queue-init.battoE:\winsw\
If you have installed your Python virtual environment somewhere other than E:\venv then you must edit the
E:\winsw\queue-init.bat file to ensure that the path to python.exe in the ^<executable^> line, and the
path to manage.py in the ^<arguments^> line point to the correct places for your installation as shown in the
extract of queue-init.bat shown below.
echo ~~~~~~~~~~~~~~~~~~~~~~~~~~~~~~~
echo ~ Instantiating new consumers ~
echo ~~~~~~~~~~~~~~~~~~~~~~~~~~~~~~~
echo.
for /l %%x in (1, 1, %workers%) do (
    (
        echo ^<service^>
        echo   ^<id^>huey-consumer-%%x^</id^>
        echo   ^<name^>HUEY CONSUMER %%x^</name^>
        echo   ^<description^>This service runs a huey consumer.^</description^>
        echo   ^<executable^>E:\venv\Scripts\python.exe^</executable^>
        echo   ^<arguments^>E:\venv\Lib\site-packages\openrem\manage.py run_huey^</arguments^>
        echo   ^<onfailure action="restart" /^>
        echo   ^<startmode^>Automatic^</startmode^>
        echo   ^<serviceaccount^>
        echo     ^<domain^>%domain%^</domain^>
        echo     ^<user^>%username%^</user^>
        echo     ^<password^>%password%^</password^>
        echo     ^<allowservicelogon^>true^</allowservicelogon^>
        echo   ^</serviceaccount^>
        echo ^</service^>
    ) > "consumer-files\huey-consumer-%%x.xml"
    echo Preparing huey-consumer-%%x...
    COPY WinSW.exe consumer-files\huey-consumer-%%x.exe >nul
    start /B /W "" consumer-files\huey-consumer-%%x.exe stopwait >nul
    start /B /W "" consumer-files\huey-consumer-%%x.exe uninstall >nul
    echo Installing huey-consumer-%%x as service...
    start /B /W "" consumer-files\huey-consumer-%%x.exe install >nul
    echo Starting huey-consumer-%%x service...
    start /B /W "" consumer-files\huey-consumer-%%x.exe start >nul
)
Make sure that the previously downloaded and renamed WinSW.exe file is in the same folder (E:\winsw\).
Double click the
queue-init.batfileEnter your Domain name or leave empty if you have added a local Windows user
Enter the username of the previously created account
Enter the associated password
Enter the number of workers you would like to spawn. This number should no exceed the number of CPU cores available to your system
Wait for the services to get registered and started up (note: many windows may appear and disappear quickly; you may also be asked to confirm that running the .exe file is safe)
You should now be able to see the new workers in the list of Windows Services. Search for services on the Windows
Start menu and you will be shown a list of installed services. The OpenREM task workers are shown as
HUEY CONSUMER n, where n is the worker number, as shown in figure 11.
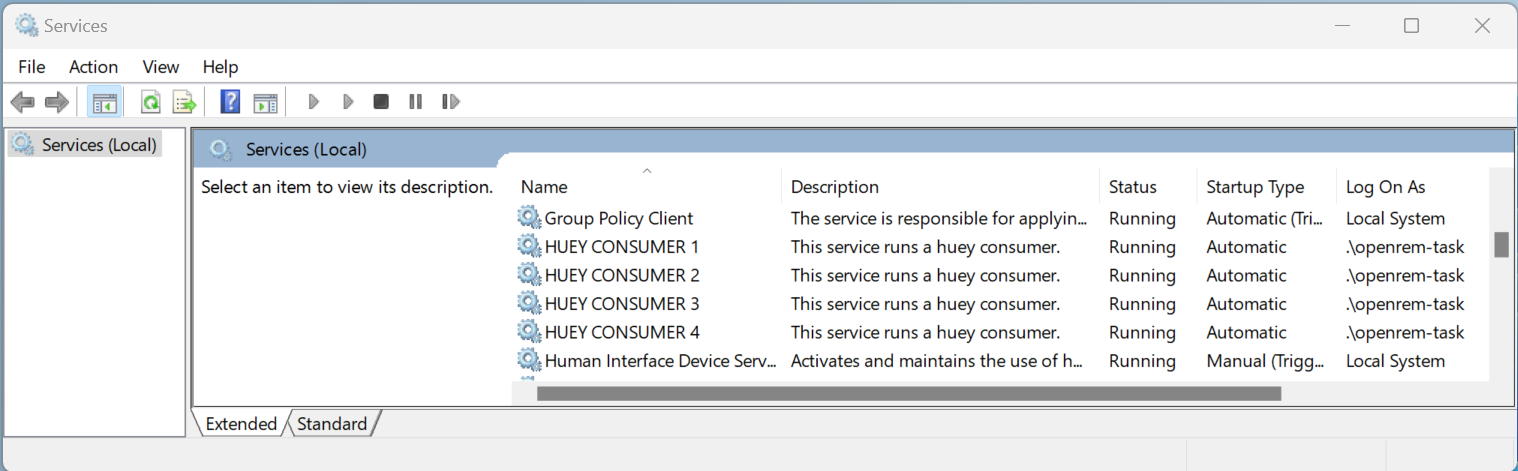
Figure 11: Four Huey task workers in the Services window
Adjusting IIS Application Pool Identity
Open
Internet Information Services (IIS) Managerfrom the Start menu or the Administrative Tools.In the
Connectionspane expand the tree under server nameClick on
Application PoolsRight click on
OpenREMin the middle paneClick
Advanced Settings...Under
Process Modelclick onIdentityand then on the grey…boxSelect the
Custom account:radio buttonClick on
Set...Enter the credentials of the preivously created account. If you are in an Active Directory prefix ther usernmae with
<YOUR-DOMAIN>\Click
OKthree times
DICOM Store SCP
Copy the Lua file to the Orthanc folder. This will control how we process the incoming DICOM objects.
Copy the file from
E:\venv\Lib\site-packages\openrem\sample-config\openrem_orthanc_config_windows.luatoE:\orthanc\
Edit the Orthanc Lua configuration options - right click on the file you just copied Edit with Notepad++
Set use_physics_filtering to true if you want Orthanc to keep physics test studies, and have it put them in the
E:\orthanc\dicom\ folder. Set it to false to disable this feature. Add names or IDs to
physics_to_keep as a comma separated list.
-- Set this to true if you want Orthanc to keep physics test studies, and have it
-- put them in the physics_to_keep_folder. Set it to false to disable this feature
local use_physics_filtering = true

-- A list to check against patient name and ID to see if the images should be kept.
-- Orthanc will put anything that matches this in the physics_to_keep_folder.
local physics_to_keep = {'physics'}
Lists of things to ignore. Orthanc will ignore anything matching the content of these comma separated lists; they will not be imported into OpenREM.
-- Lists of things to ignore. Orthanc will ignore anything matching the content of
-- these lists: they will not be imported into OpenREM.
local manufacturers_to_ignore = {'Faxitron X-Ray LLC', 'Gendex-KaVo'}
local model_names_to_ignore = {'CR 85', 'CR 75', 'CR 35', 'CR 25', 'ADC_5146', 'CR975'}
local station_names_to_ignore = {'CR85 Main', 'CR75 Main'}
local software_versions_to_ignore = {'VixWin Platinum v3.3'}
local device_serial_numbers_to_ignore = {'SCB1312016'}
Enable or disable additional functionality to extract dose information from older Toshiba and GE scanners, and specify
which CT scanners should use this method. Each system should be listed as {'Manufacturer', 'Model name'}, with
systems in a comma separated list within curly brackets, as per the example below:
-- Set this to true if you want to use the OpenREM Toshiba CT extractor. Set it to
-- false to disable this feature.
local use_toshiba_ct_extractor = true

-- A list of CT make and model pairs that are known to have worked with the Toshiba CT extractor.
-- You can add to this list, but you will need to verify that the dose data created matches what you expect.
local toshiba_extractor_systems = {
        {'Toshiba', 'Aquilion'},
        {'GE Medical Systems', 'Discovery STE'},
}
Save any changes.
Edit the Orthanc configuration. Navigate to C:\Program Files\Orthanc Server\Configuration and right click on
orthanc.json and click Edit with Notepad++:
Add the Lua script to the Orthanc config:
// List of paths to the custom Lua scripts that are to be loaded
// into this instance of Orthanc
"LuaScripts" : [
"E:\\orthanc\\openrem_orthanc_config_windows.lua"
],
Set the AE Title and port:
// The DICOM Application Entity Title
"DicomAet" : "OPENREM",

// The DICOM port
"DicomPort" : 104,
Note
Optionally, you may also like to enable the HTTP server interface for Orthanc (although if the Lua script is removing all the objects as soon as they are processed, you won’t see much!):
// Whether remote hosts can connect to the HTTP server
"RemoteAccessAllowed" : true,

// Whether or not the password protection is enabled
"AuthenticationEnabled" : false,
You will also need to open the firewall for port 8042.
To see the Orthanc web interface, go to http://openremserver:8042/ – of course change the server name to that of your server!
Save any changes.
Allow DICOM traffic through the firewall
Type
windows firewallin the Start menu to openWindows Defender FirewallClick
Advanced settingsin the left hand pane to openWindows Defender Firewall with Advanced SecurityClick
Inbound Rulesin the left hand paneClick
New Rule...in the right hand paneClick
PortandNext >Leave as
TCPand specify port104and clickNext >Allow the connection,Next >Leave the boxes ticked for
When does this rule applyif that is appropriate,Next >Name
Orthanc DICOM portFinish
Finish off
Restart Orthanc:
Launch
Servicesfrom the start menuFind
Orthancon the list and clickRestartOrthanc logs can be reviewed at
C:\Program Files\Orthanc Server\Logs- the current log file will have the latest date and time in the filename - right clickEdit with Notepad++
You can check if the port is running and allowed through the firewall using the Network tab of Resource Monitor.